Archive for the ‘Tips and tutorials’ Category
Always keep your Web Applications updated!
Jul 14 21
It is vitally important to keep your web applications updated to the latest version. Any old versions of software may have security flaws which allow hackers to get in!
A web application is a type of program you install onto your web space, designed to help you perform specific tasks within your website. There are hundreds of web apps which can do all sorts of useful things for your website, and many that can even design your site for you. If you own a smart phone chances are you have installed lots of apps and chances are there is a seemingly constant flow of updates for them. Similarly on your PC, you will be prompted to update your programs whenever there is one available. Below is a couple of update pop ups you may have seen on your computer.
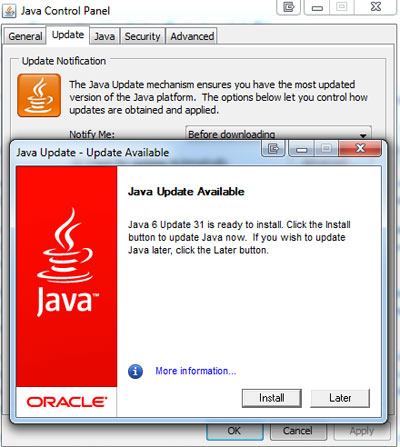
There are several possible reasons why an application is updated. More often than not it is because the designers have added new features to it. Probably the most important reason is for security. New versions often fix security vulnerabilities in older versions of software. If you stick to an old version of software it may be vulnerable to attacks by hackers.
There are many ways a hacker can get into your site, or the server your site is hosted on. To combat this is the many updates and security patches that are made available. So however inconvenient it is, you should ALWAYS update your web apps and programs.
How to use your computers ‘hosts file’
May 13 14
Each computer has a host file, which is used to map hostnames to IP addresses. This can show you what your website will look like on another server before it goes live, which is handy for previewing or testing your website before you change the server.
The following instructions explain how to use it.
WINDOWS
On a Windows pc firstly you need to open the Notepad application, but you need to open it with Administrator priveleges. To do this go to ‘All Programs’ then ‘Accessories’ and then right click on the Notepad icon and click on ‘Run as Administrator’
You then need to open the Hosts file by clicking ‘File’ then ‘Open’ and navigate to the hosts file which is in the following location:
c:\windows\system32\drivers\etc\hosts
Your hosts file will look like this:
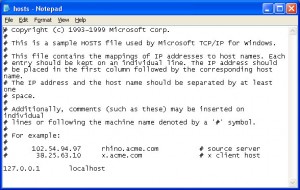
You can then enter the new server IP address along with your domain name to make your computer show your website from that server.
For example if we are switching your website onto a server with ip address 87.239.18.108 you enter the following line underneath localhost:
87.239.18.108 www.mydomainname.co.uk
Once this is entered you save the changes to the file and then close Notepad.
You then need to ‘Flush the DNS’ on your system to make sure the changes are saved correctly. To do this open the Command Prompt screen by typing cmd in the Windows search. Once the screen is open type the following:
ipconfig /flushdns
Then press enter.
You will receive a message to say that the DNS cache is successfully resolved.
This will then make your browser see the website on the new server, even though it is not live yet.
MAC
On a Mac the hosts file is located at:
private/etc/hosts
To edit the hosts files, open the terminal which is located at /Applications/Utilities/Terminal.app, then enter the following:
sudo nano /private/etc/hosts
The screen will look like this:
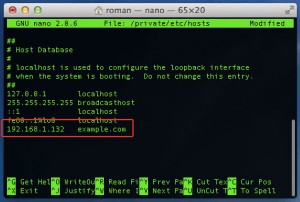
You then use the arrow keys to move the cursor to the end of the last line and then enter your new line. When you have entered the line save the file by pressing Control + O keys. It will ask where to write, with the Hosts file already typed, press Enter to overwrite.
To then flush the DNS cache type the following command:
dscacheutil -flushcache
Then press Control + X to close the terminal.
DNS Records Explained
Jan 13 28
Most website owners would not know about, or would ever have heard of DNS.
But without it they would not have a website, nor would they be able to send and receive emails.
DNS or (Domain Name System) is a database system that contains mapping of domain names to their IP addresses. The DNS records are added to the web server and this is what makes your website and emails resolve across the Internet.
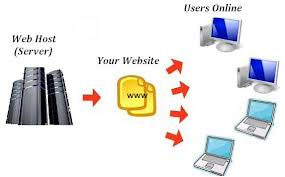 There are several different types of DNS records. Most websites will have the following types of DNS:
- A RECORD – An A record assigns an IP address to a domain or sub-domain. (e.g – your-name-here.co.uk points to 209.204.202.85)
- CNAME – A CNAME record or canonical name record makes one domain name an alias of another. The alias acquires all the records of the original domain. (e.g. – www.your-name-here.co.uk is a CNAME of your-name-here.co.uk)
- MX RECORD – An MX record or mail exchange record specifies which mail server is responsible for accepting email for a domain name (e.g. – mail for your-name-here.co.uk is handled by ALT1.ASPMX.L.GOOGLE.COM)
- NS RECORD – An NS or Nameserver record specifies which servers will implement the DNS service for a particular domain name (e.g. – your-name-here.co.uk points to ns.host4u.net and ns1.host4u.net nameservers)
- PTR RECORD – a PTR record resolves an IP addresses into a hostname, this is sometimes referred to as ‘Reverse DNS’ (e.g. – The PTR record for your-name-here.co.uk is ‘85.202.204.209.in-addr.arpa’
With Your Name Here we assign a control panel with each domain registration, which allows you to modify your DNS records yourself. However DNS records can be quite complicated and you should only modify the DNS if you know exactly what you are doing.
You can request DNS changes via our support section, or by emailing us directly.
How to send and receive your domain emails using Gmail servers.
Dec 12 10
 A Gmail account is very easy to set up and can also be used to send and receive your domain name’s emails.
This is a very handy freebie which can come in very useful for people who are having problems sending emails using their Internet Provider.
They also allow a huge 8GB of storage space for your account. This will be particularly appealing for users with IMAP accounts, whereby all the emails you send and receive are stored on the server and this does require a lot of space.
The instructions for setting up your domain name emails in Gmail are as follows:
1. If you do not have one already, sign up for a Gmail account here
2. Once you are signed up, go to your homepage/inbox and click on the ‘Settings’ section in the top right of the screen.
3. Click on ‘Accounts and Import’ and then click on ‘Add another email address you own’
4. Enter your email address and then choose the ‘Send through Gmail’ option.
5. You will then be prompted to send verification to your email address to confirm you are the owner. Once you receive the email follow the instructions.
6. Then go back to ‘Settings’ section and your email address will be listed as an alternative to your Gmail one.
7. Click on the ‘Make Default’ button to make this your standard email address.
Pointing your domain’s mail records to Google
Each domain name has ‘DNS records’ which tell the Internet which web servers handle your website and emails. When you set up your mail with Google, you then have to modify your ‘MX Records’ to let the Internet know that Google will be handling your mail.
To do this you need to login to your Control Panel and go to the DNS section.
Then highlight your existing MX records and click on ‘Remove’
Then you need to add the following records:
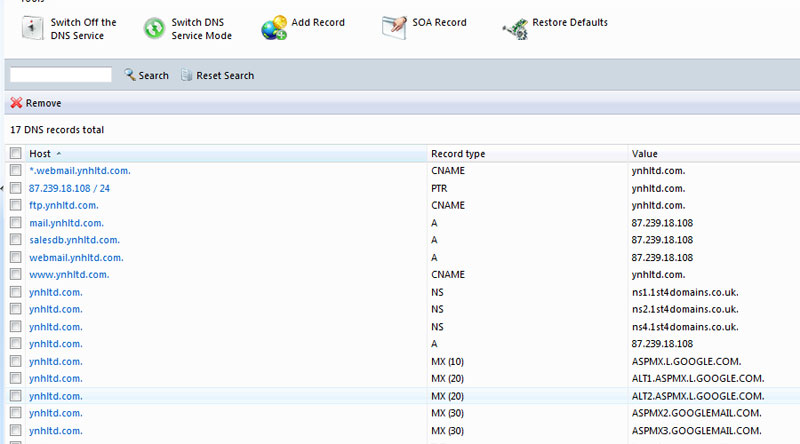
The above MX records will point your emails to Google so that their mailservers can handle your emails.
For a full explanation of how DNS records work please visit the following page:
http://www.your-name-here.co.uk/blog/2013/01/28/dns-records-explained/
Make the most of your Spam Filter
Oct 09 07
The fight against Spam is a significant challenge that you face daily, and it continues to be one of the biggest problems on the Internet. Spammers are clever and they will continually conjure up new ways to bypass spam filters, so unwanted email will always be there, but you can dramatically reduce the amount of spam you receive if you use your Spam filter correctly.
Spam Assassin 
At Your-Name Here our choice of default Spam Filter is Spam Assassin.
SpamAssassin uses a variety of spam-detection techniques, that includes sophisticated scoring filters, Bayesian statistics, external programs, blacklists and online databases.
Used correctly, it can be a very effective deterrent against unwanted email.
How to configure Spam Assassin.
- Firstly login to your Plesk control panel.
- Click on the Mail icon under Services.
- Click on the email address you would like to configure settings for.
- Then click on the Spam Filter icon in the Tools section.
- In the Preferences section, you firstly set the score/tolerance level that email must hit before it is recognised as Spam. Each email is scored between 1 and 10 . As an example, if you were to receive an email with the subject ‘Buy Viagra Now’ that would score 8 or 9 as it is obviously Spam. The default setting is 7, which is usually a good place to start, but if you feel Spam is not being recognised enough, you just lower it to 6 or 5 and see how it goes.
- The What to do with Spam section gives you the choice to remove Spam automatically when it comes to the mailbox, or still deliver the email and mark it as xxxSpamxxx. If you want to include into the subject line the number of points that messages score, type _SCORE_ in this box. This will help you determine the best score setting to have.
- Next is the Blacklist section which allows you block specific addresses or domains that you do not want to receive mail from. You can add muliple entries, seperated by a tab, a colon or a comma. If you do not want to receive anything from any address at a particular domain you can use * as a wildcard. Just type *@domain.com and any user at that domain will be blacklisted.
- Similarly there is also a Whitelist section. If you want to be sure you do not miss any emails from specific senders, you can add multiple entries to your Whitelist in the same way.
- Click on the Training tab to improve accuracy of spam detection by training the spam filter on the e-mail messages that you have in your mailbox. Simply highlight an email and click on ‘It’s Spam’ or ‘Not Spam’ Once finished with training, you can remove spam e-mails from your mailbox using your e-mail program or Horde IMP Webmail interface.
- Once finished with your spam filter settings, remember to click the ‘Switch On’ icon, and then click OK.
That’s it! Your Spam filtering is now enabled and set to your specific requirements. The settings can be modified at any time in the same area of your Plesk control panel.
How do I upload my webfiles?
Sep 09 29
There are two main ways to upload your website files to your web hosting server:
FTP (File Transfer Protocol)
The most common way to upload your files is through FTP. This requires an FTP program. There are many FTP programs out there but we would recommend Filezilla as it is very user friendly. You can download Filezilla free from the following address:
http://filezilla-project.org/ 
and click on ‘Download Filezilla client’
Once you have downloaded this, open up Filezilla and click on the top left icon (computer screen) and click ‘New Site’ and enter ****domain*** or any description as this is just the label for the site, then enter the following details into the boxes:
Host = Given in your web hosting welcome email
Port = 21
Servertype = FTP
LogonType = Change the drop down list to Normal
Username = Given in your web hosting welcome email
Password = Given in your web hosting welcome email
Then click Connect, and double click on the ‘httpdocs’ folder to enter
your hosting webspace.
Once you are connected you will have 2 split windows, the left hand side is the files on your computer, the right hand side is your web space, in order to upload your files you need to either drag and drop from left to right, or double click on your left hand files to upload to the right. You will notice the transfer progress on the bottom of the screen. If all is well Filezilla should display the files you have uploaded on the right hand screen and your website should now be visible in your internet browser window.
Using the Plesk File Manager to upload your files.
This method comes on any package hosted on a Plesk server 
You will be given your control panel user details in your welcome email. Once logged into the control panel you will see this icon. Click on this and you will again be connected to your server’s web directories and again click on ‘httpdocs’ to manage your webfiles.
How to use the File Manager
Once you click into your httpdocs directory your webfiles will appear as in the image below:
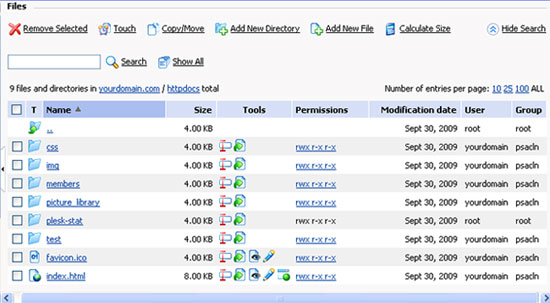
Other commands you can do from here would be to create or delete folders and files, change file and folder permissions, edit existing files and rename files and folder. Here are a few more helpful tips to use with Plesk’s File Manager:
- To upload a file to the current directory, click add new file, then either browse your computer or ‘create new’ file and specify its location. Click OK.
- To create a folder that will be located in the current directory, click ‘Add New Directory’, then type in the directory name in the Directory name field and click OK.
- To edit an existing file source, click the Edit File icon (pencil). The File Manager’s editor window will open, allowing you to edit the file source. When you have finished with your changes, click ‘Save’ to save the file then OK to save the file and return to the File Manager panel.
- To remove a file or directory, select the corresponding checkbox, and click Remove Selected.
- To rename a directory or file, click on the Rename icon (small rectangle). A new page will open allowing you to rename the selected file or directory. Type in a new name and click OK.
- To change permissions for a file or directory, click on the permissions icon (which will look something like rw- r– r–) the permissions settings page will open, allowing you to set the required permissions. Select the correct settings for the file then click OK to submit.
