
Posts Tagged ‘Email’
How to set up your email account on a Samsung Galaxy
Feb 18 09
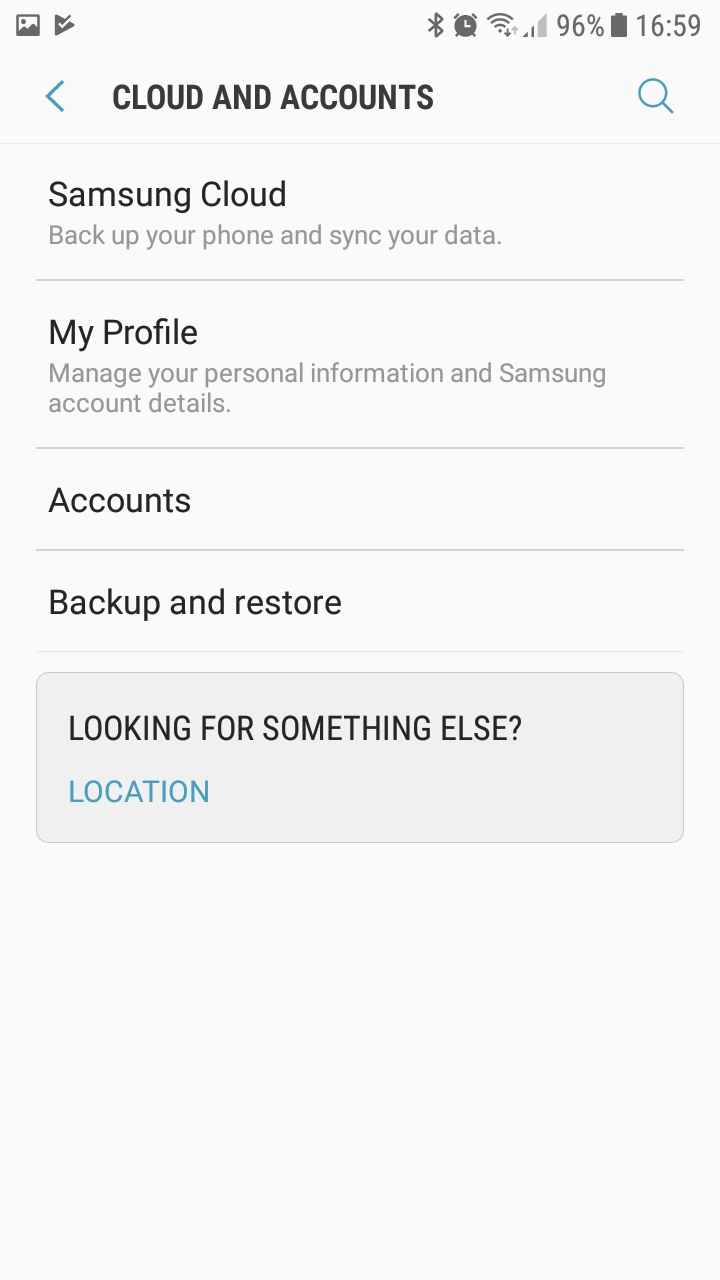
The following instructions are for setting up your domain’s email address on your Samsung Galaxy device. Firstly go the the Settings sections of your device and click on ‘Cloud and Accounts’ and then click on ‘Accounts’

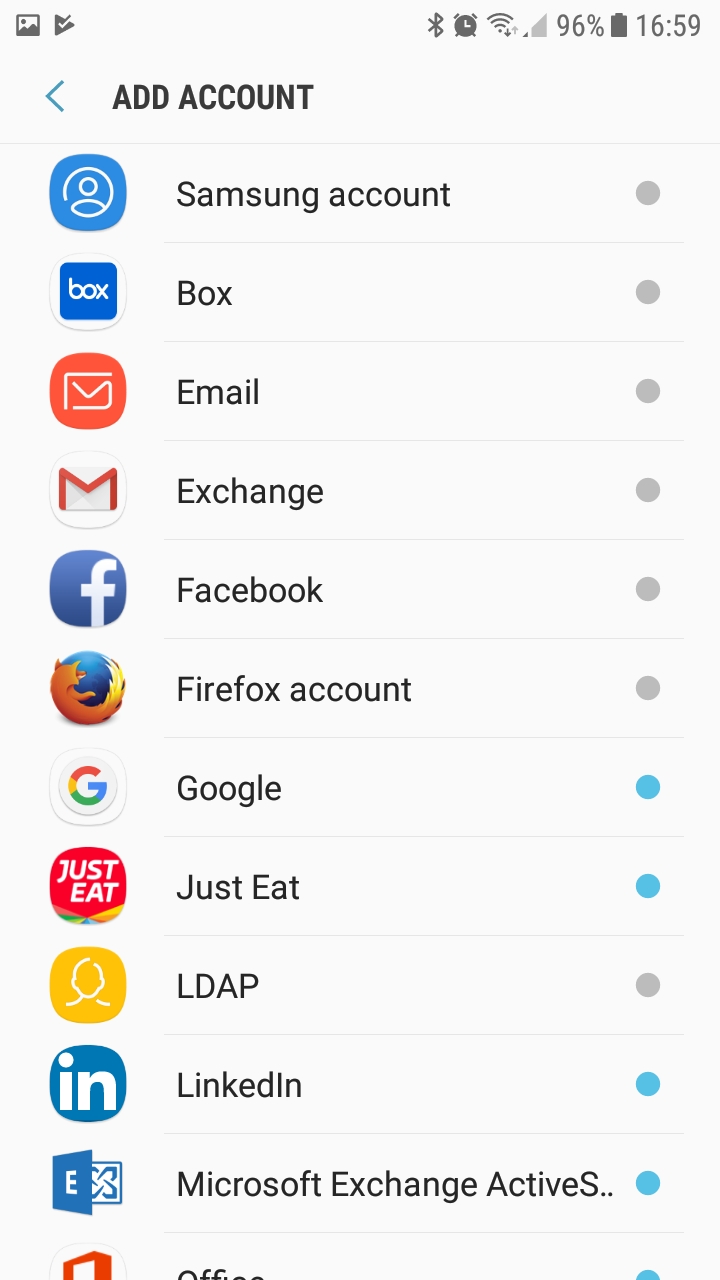
Then click on ‘Email’ to set up your own domain email account
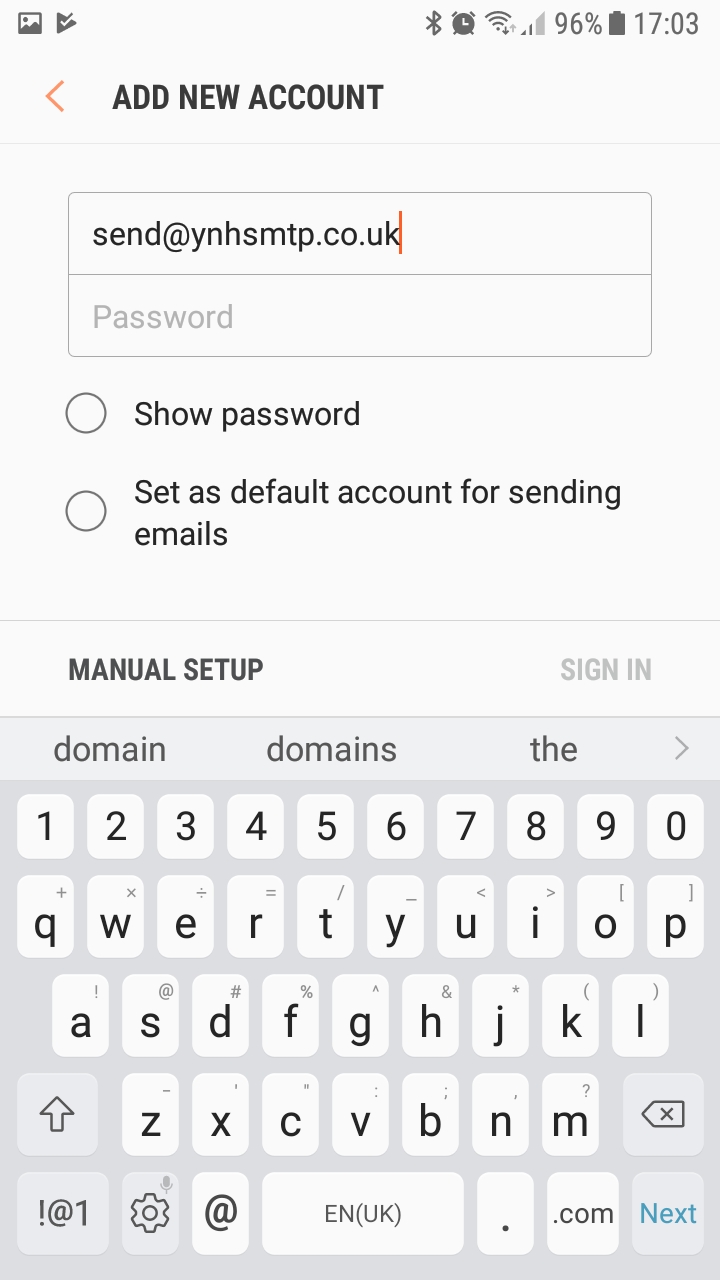
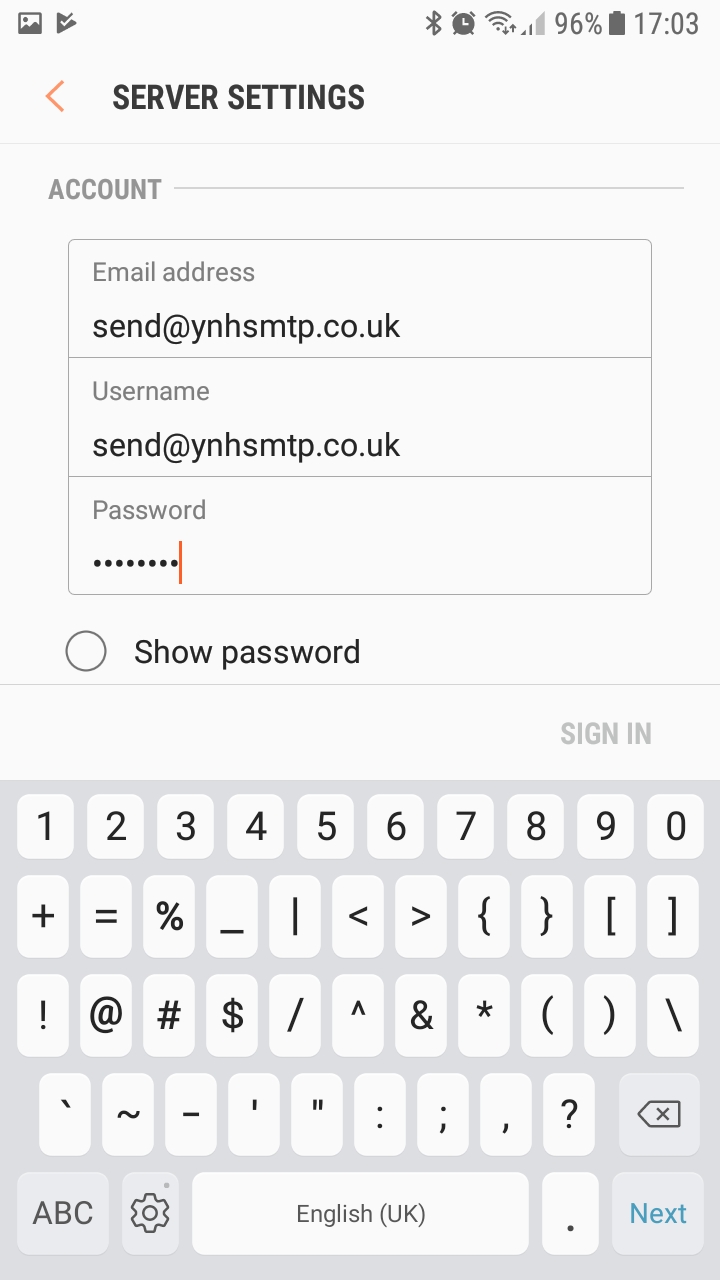
Then you will be prompted to add your email address and password. Once you have entered this ionformation click on ‘MANUAL SETUP’
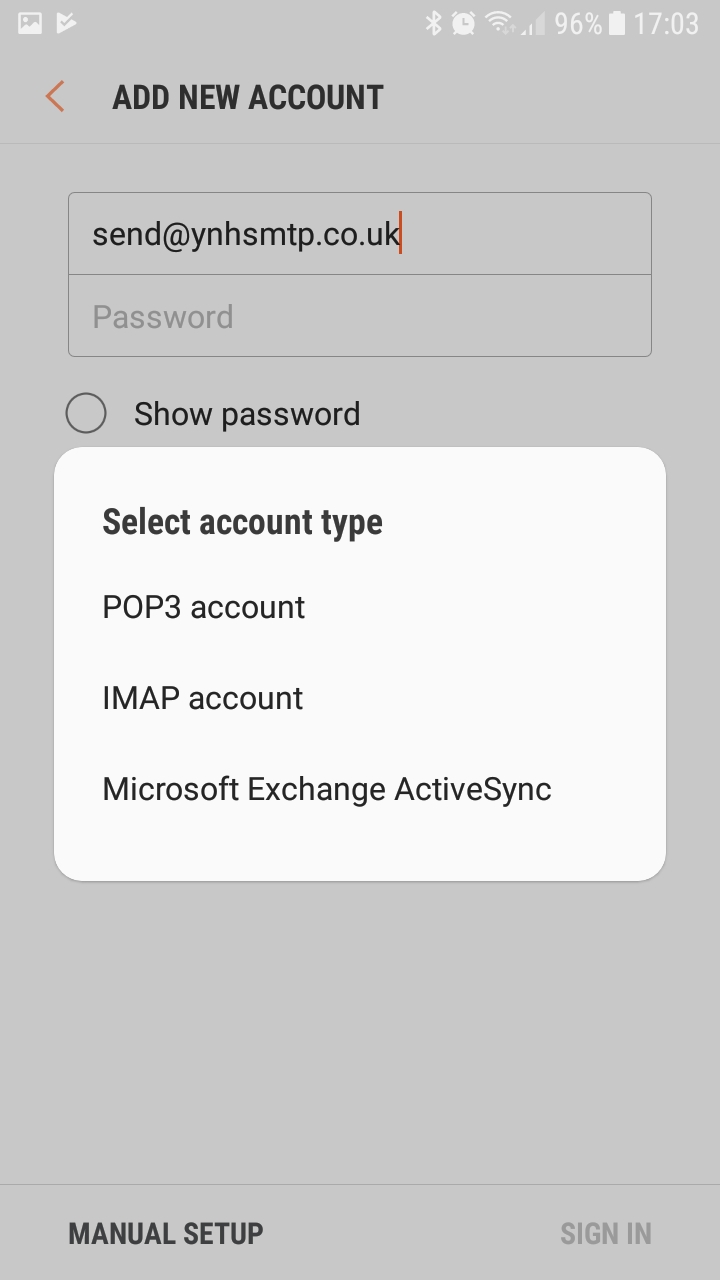
It will then ask you if you would like to set up a POP or IMAP account. For further information on choosing between POP and IMAP click here.
Your username should be your full email address:
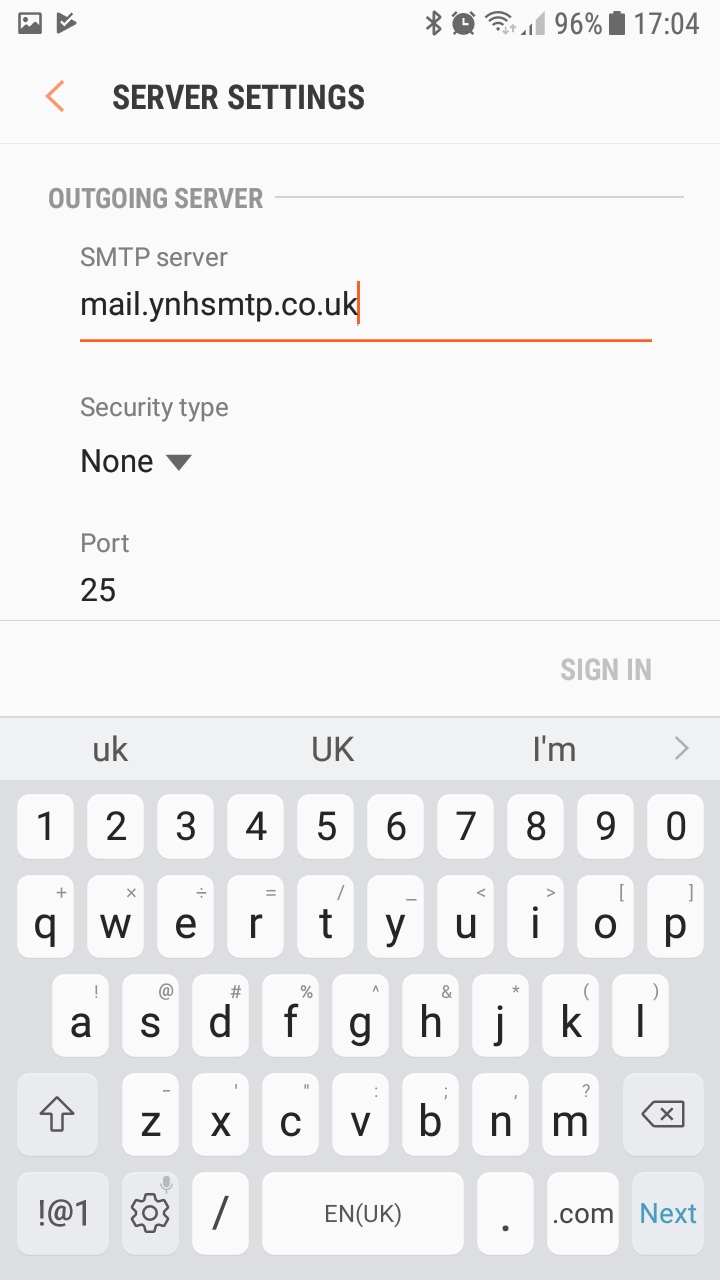
You will then be asked for the incoming and outgoing mailserver addresses and this will be mail.yourdomainname.co.uk (replace yourdomainname.co.uk with your actual domain name)
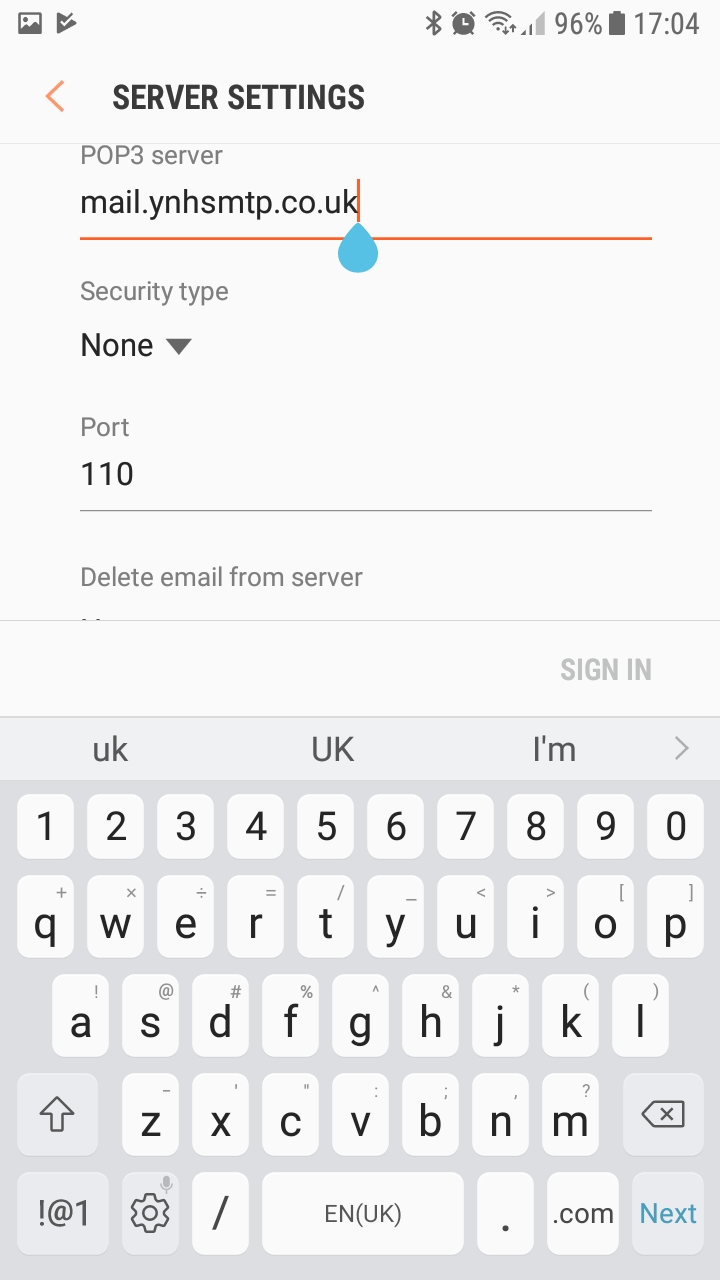
The address is exactly the same for the outgoing mailserver. Keep the port numbers to the defaults.
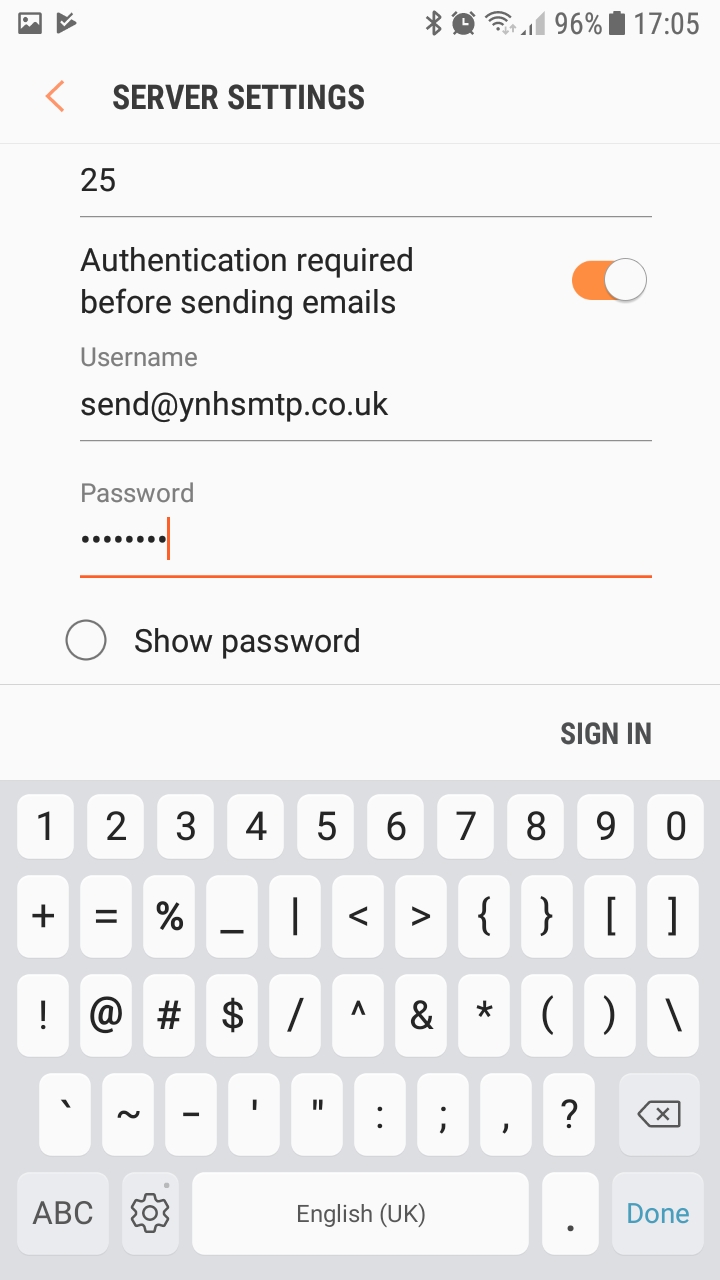
The outgoing server requires authentication so enable this option on this screen:
Once you have entered this information the account is set up and it will return you to the accounts screen:
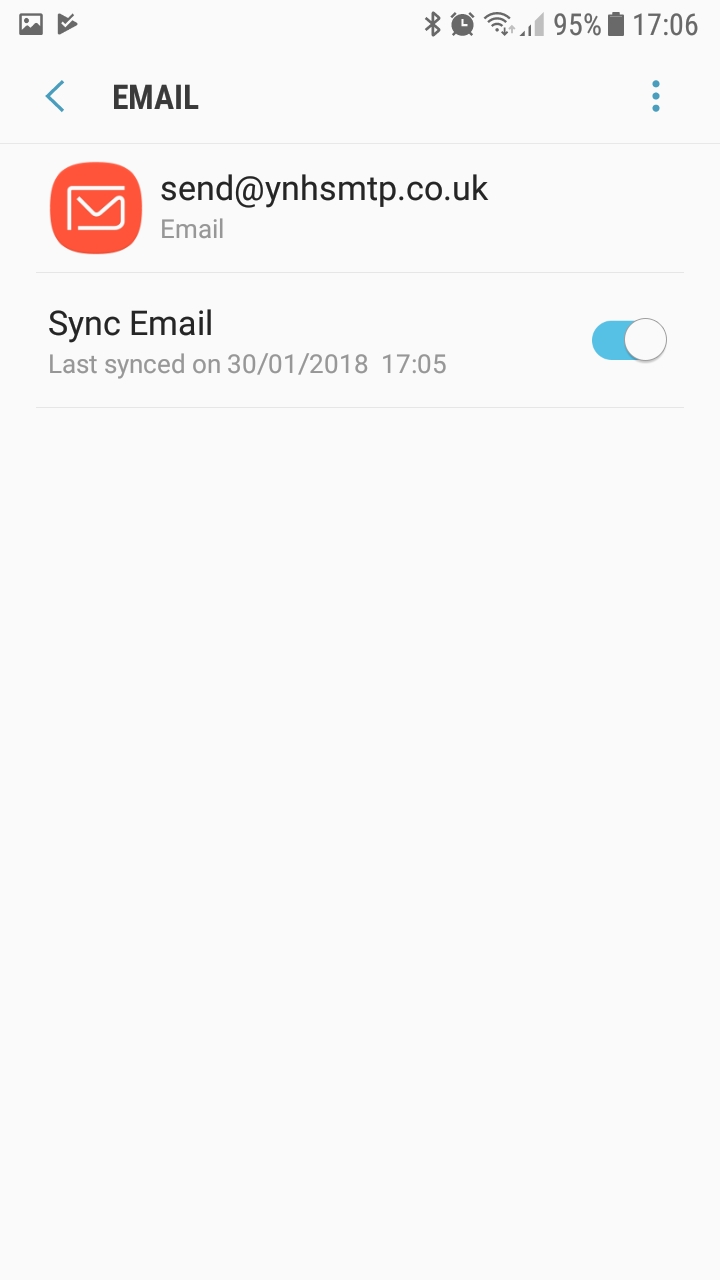
You can then return to your homescreen as your account will be ready to go:
Use a professional email address instead of Hotmail or Gmail
Jul 17 28
Using your own business email address looks much more professional than a free service such as Hotmail or Gmail.
Your email address represents you and your business so you want an address which looks established and presentable. When I receive an email from a business but the address is ‘davetheplumber@hotmail.co.uk’ it just looks unprofessional and less serious than ‘david@dhplumbing.co.uk’
Also the second address will look much more professional on the dhplumbing.co.uk website.
Like most people I have a Hotmail address and a Gmail address but they are used for personal interests such as online shopping and signing up for online services.
If you are still using a personal email address for your business, we strongly recommend that you take advantage of the free email accounts we offer. We can help you get this set up very quickly.
How to set up your email account on a Galaxy S3
Mar 13 19
The following instructions are for setting up your domain’s email address on a Samsung Galaxy S3:

Firstly go to the Settings section of your Phone and scroll down to Add Account

Then choose Email to enter your account settings.

Enter you email address and password, then click on Manual Setup

You will then be asked which type of account you would like to set up, in most cases this will be POP3

You will then be asked for the address of your POP server which is mail.yourdomainname.co.uk (just replace yourdomainname.co.uk with your actual domain name)
You don’t need to enter a security type and the port number should be 110 (which it will be by default)
Then go to Next

You then need to enter the settings for the Outgoing Mailserver. Tick the ‘Require Sign In’ box and then enter your email address and password again.
Then click on Next.

You will then be shown additional account options such as receiving a notification when an email arrives.
If this is the main email account on your phone you can tick the box which says Send email from this account by default.
Then click on Next.

The account is then set up. You can give the account a name if you wish and then enter your name, as you want it to appear in a recipient’s mailbox.
Then click on Next and you’re done.
How to set up an email account in Thunderbird
Nov 12 12
The following instructions are for setting up your domain’s email address in Mozilla Thunderbird:
1. In Thunderbird, go to the Tools menu and then select Account Settings. Then go to Account Actions and click on Add Mail Account:

2. Enter your name email address and password and click on Continue.

3. Click on Manual Config to enter your own server details:

3. Choose pop or imap and enter the incoming mailserver details which will be mail.your-name-here.co.uk (obviously replace your-name-here.co.uk with your actual domain name).
The port numbers are 110 for the incoming mailserver and 25 for the outgoing mailserver.
You should choose Normal Password to authenticate the servers
The username will be the full email address you are setting up.
Then click on Done and your account will then be added to Thunderbird.
The difference between POP3 and IMAP email accounts.
Oct 11 26
Many people may not even know this but when you are setting up your email
addresses there are two different account types you can set up – POP or IMAP. POP3 is the standard on most email clients and it is the most widely used, but IMAP may be more suitable depending on how you want to handle your emails.
POP3
POP3 (Post Office Protocol 3) is the most widely used for email accounts. With
POP3, new messages are downloaded off the mailserver and stored on your email
client. So managing all operations on the account such as reading, deleting or
moving an email are all handled on your computer rather than on the mailserver.
This means the account is available whether you are online or offline and no
changes are communicated back to the mailserver.
Pros and Cons of POP3:
Pros:
- POP3 is well supported in all email clients.
- POP3 is faster than IMAP.
- You can view and manage your emails offline.
- Most email clients will allow you to keep a copy of email on the server.
Cons:
- Your email can only be viewed on one device
IMAP
IMAP (Internet Message Access Protocol) differs from POP3 in that your emails are stored on the mailserver and all actions performed on the account are communicated back to the mailserver.
IMAP is useful for managing your account through more than one device. You can have the account set up at work, at home and on your phone, and anything you do on the account such as mark the email as read, or add a new folder etc will be seen the same way on each device. e.g You send an email from your phone and you can then see that in the sent folder on your
computer when you get home.
Pros and Cons of IMAP:
Pros:
- Your email messages can be synchronized over multiple devices.
- All folders -Inbox, Sent Items, Trash etc are available on all devices you use.
- More than one person can simultaneously manage the same email account.
Cons:
- You must be online to view your emails.
- IMAP uses more bandwidth.
- IMAP is slower
Email Scam – Internet Trademark Intellectual Property Rights
Oct 09 16
There seems to be a new wave of this particular scam email, usually from the ‘Domain name registration center in Shanghai’ or the ‘Domain name registration organisation of Asia’ or similar.
The email will read something like:
—–Original Message—–
> *From:* fiona [mailto:fiona@east-technology.org]
> *Sent:* 08 October 2009 08:34
> *To:* office@your-name-here.co.uk
> *Subject:* Re:Europeanarts-Intellectual property rights (To CEO)
> *Importance:* High
>
> Dear CEO,
>
> We are the domain name registration organization in Asia, which mainly
> deal with international company’s in Asia. We have something important
> need to confirm with your company.
>
> On Oct.7,2009, we received an application formally. One company named
> “Baldfiltering company” wanted to register the following domain names:
>
> your-name-here.asia
> your-name-here.cn
> your-name-here.com.cn
> your-name-here.com.hk
> your-name-here.com.tw
> your-name-here.hk
> your-name-here.cn
> your-name-here.tw
>
> and Internet Trademark:Europeanarts
>
> through our entity.
>
> After our initial examination, we found that the keyword and domain
> names applied for registration are as same as your company’s name and
> trademark. These days we are dealing with it. If you do not know this
> company, we doubt that they have other aims to buy these domain names.
> Now we have not finished the registration of Baldfiltering company
> yet, in order to deal with this issue better, Please contact us by
> telephone or email as soon as possible.
>
> Best Regards,
>
> Fiona
>
> **Auditing Department **
Do not be taken in by this, as it is nothing more than a misleading and dishonest marketing ploy.
They basically want you to contact them so they can explain the importance of you buying all those domain extensions from them.
If, for any reason you would like to buy the Hong Kong extension of your domain name that’s fine, but you should go through a trusted domain registration company.
The article in this link explains what happened when one domain owner replied. Notice the amounts they want to charge towards the bottom of the article. Also the many comments from other domain owners who have received similar emails.
Make the most of your Spam Filter
Oct 09 07
The fight against Spam is a significant challenge that you face daily, and it continues to be one of the biggest problems on the Internet. Spammers are clever and they will continually conjure up new ways to bypass spam filters, so unwanted email will always be there, but you can dramatically reduce the amount of spam you receive if you use your Spam filter correctly.
Spam Assassin 
At Your-Name Here our choice of default Spam Filter is Spam Assassin.
SpamAssassin uses a variety of spam-detection techniques, that includes sophisticated scoring filters, Bayesian statistics, external programs, blacklists and online databases.
Used correctly, it can be a very effective deterrent against unwanted email.
How to configure Spam Assassin.
- Firstly login to your Plesk control panel.
- Click on the Mail icon under Services.
- Click on the email address you would like to configure settings for.
- Then click on the Spam Filter icon in the Tools section.
- In the Preferences section, you firstly set the score/tolerance level that email must hit before it is recognised as Spam. Each email is scored between 1 and 10 . As an example, if you were to receive an email with the subject ‘Buy Viagra Now’ that would score 8 or 9 as it is obviously Spam. The default setting is 7, which is usually a good place to start, but if you feel Spam is not being recognised enough, you just lower it to 6 or 5 and see how it goes.
- The What to do with Spam section gives you the choice to remove Spam automatically when it comes to the mailbox, or still deliver the email and mark it as xxxSpamxxx. If you want to include into the subject line the number of points that messages score, type _SCORE_ in this box. This will help you determine the best score setting to have.
- Next is the Blacklist section which allows you block specific addresses or domains that you do not want to receive mail from. You can add muliple entries, seperated by a tab, a colon or a comma. If you do not want to receive anything from any address at a particular domain you can use * as a wildcard. Just type *@domain.com and any user at that domain will be blacklisted.
- Similarly there is also a Whitelist section. If you want to be sure you do not miss any emails from specific senders, you can add multiple entries to your Whitelist in the same way.
- Click on the Training tab to improve accuracy of spam detection by training the spam filter on the e-mail messages that you have in your mailbox. Simply highlight an email and click on ‘It’s Spam’ or ‘Not Spam’ Once finished with training, you can remove spam e-mails from your mailbox using your e-mail program or Horde IMP Webmail interface.
- Once finished with your spam filter settings, remember to click the ‘Switch On’ icon, and then click OK.
That’s it! Your Spam filtering is now enabled and set to your specific requirements. The settings can be modified at any time in the same area of your Plesk control panel.