Posts Tagged ‘Map IP addresses’
How to use your computers ‘hosts file’
May 13 14
Each computer has a host file, which is used to map hostnames to IP addresses. This can show you what your website will look like on another server before it goes live, which is handy for previewing or testing your website before you change the server.
The following instructions explain how to use it.
WINDOWS
On a Windows pc firstly you need to open the Notepad application, but you need to open it with Administrator priveleges. To do this go to ‘All Programs’ then ‘Accessories’ and then right click on the Notepad icon and click on ‘Run as Administrator’
You then need to open the Hosts file by clicking ‘File’ then ‘Open’ and navigate to the hosts file which is in the following location:
c:\windows\system32\drivers\etc\hosts
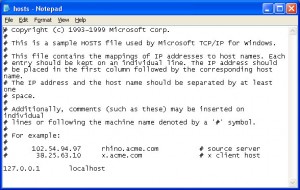
Your hosts file will look like this:

You can then enter the new server IP address along with your domain name to make your computer show your website from that server.
For example if we are switching your website onto a server with ip address 87.239.18.108 you enter the following line underneath localhost:
87.239.18.108 www.mydomainname.co.uk
Once this is entered you save the changes to the file and then close Notepad.
You then need to ‘Flush the DNS’ on your system to make sure the changes are saved correctly. To do this open the Command Prompt screen by typing cmd in the Windows search. Once the screen is open type the following:
ipconfig /flushdns
Then press enter.
You will receive a message to say that the DNS cache is successfully resolved.
This will then make your browser see the website on the new server, even though it is not live yet.
MAC
On a Mac the hosts file is located at:
private/etc/hosts
To edit the hosts files, open the terminal which is located at /Applications/Utilities/Terminal.app, then enter the following:
sudo nano /private/etc/hosts
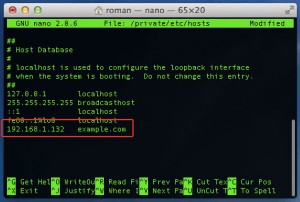
The screen will look like this:

You then use the arrow keys to move the cursor to the end of the last line and then enter your new line. When you have entered the line save the file by pressing Control + O keys. It will ask where to write, with the Hosts file already typed, press Enter to overwrite.
To then flush the DNS cache type the following command:
dscacheutil -flushcache
Then press Control + X to close the terminal.
